Learning Objectives
After completing this lesson, you’ll be able to:
- Define a web connection.
- Define a web service.
- Define a database connection.
- Add a database connection.
- Add a web connection.
Instructions
- Scroll down to read the text below.
- Complete the exercise by following the steps.
- Complete the Quiz toward the bottom of the page.
- Optional: Let us know if you found this lesson relevant to your role by filling out the survey at the bottom of the page.
- Click 'Next' to mark the lesson complete.

We don't have a video for this section yet.
Resources
- Starting workspace
- C:\FMEData\Workspaces\UseDataIntegrationBestPractices\manage-connections.fmw
- Complete workspace
- C:\FMEData\Workspaces\UseDataIntegrationBestPractices\manage-connections-complete.fmw
What Are Connections?
A great many FME readers, writers, and transformers need to authenticate to an external system, such as a relational or spatial database, an OAuth-protected web service, or an FME Flow instance. Re-typing those credentials in every workspace is tedious, error-prone, and exposes secrets to anyone who can read the workspace XML.
A connection is a saved, named bundle of authentication parameters that FME stores outside the workspace. The workspace references the connection by name only; the username, password, host, OAuth token, and other parameters never appear in the .fmw file or in the Navigator. Edit the connection once, and every workspace that uses it automatically picks up the change.
It is possible to embed credentials instead of using a connection, but we do not recommend it. This option is less secure and harder to maintain.
FME divides connections into two categories:
- Database Connections are for relational and spatial database formats, including PostgreSQL/PostGIS, Oracle, Microsoft SQL Server Spatial, Esri Geodatabase (including ArcSDE), Snowflake, and Google BigQuery. Used by readers, writers, and transformers such as the DatabaseQuerier, SQLExecutor, and SQLCreator.
- Web Connections are for REST/OAuth-based services used by the HTTPCaller and format-specific Connector transformers and readers/writers, including Google Drive, Dropbox, OneDrive, Box, ArcGIS Online, Bentley ProjectWise, and FME Flow itself.
Adding a Database Connection
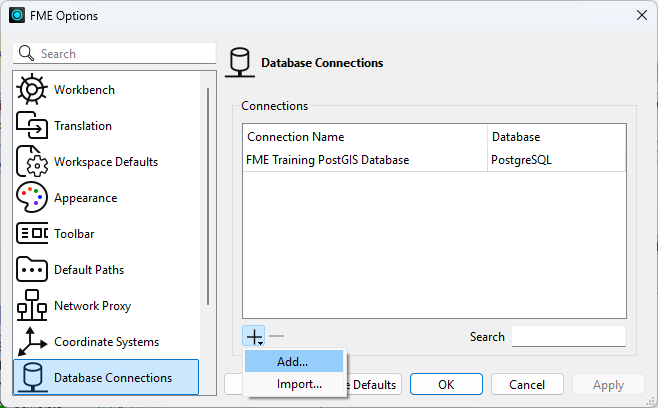
Database connections are managed under Utilities > FME Options > Database Connections. The page lists every database connection visible to your current user and current storage location.
You can add a connection in two places:
- From FME Options. Click the Add [+] button and select Add. In the Add Database Connection dialog, choose a database type (PostgreSQL/PostGIS, Oracle, SQL Server Spatial, Esri Geodatabase, Snowflake, and so on). Fill in the parameters — host, port, database name, username, password, and any type-specific options. Give the connection a name and click Save.
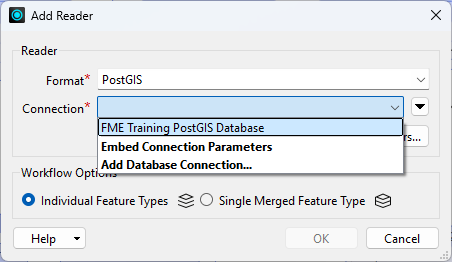
- From a workspace. When you add a reader or writer or configure a transformer such as the DatabaseQuerier, open the Connection drop-down and select Add Database Connection. The same dialog appears, and the new connection is available immediately throughout Workbench.
You can also right-click an existing connection to Duplicate, Export, or Import it. Exporting prompts for an optional password — if you set one, it must be at least 12 characters.
The following characters are not allowed in connection names: ^ \ / : * ? " < > | & = ' + % #
Adding a Web Connection
Web connections are managed under Utilities > FME Options > Web Connections. There are two layers to understand:
- A web service is a reusable template that describes how to authenticate to a provider — the authorization protocol (OAuth 2.0, Token, or HTTP Authentication) and the endpoints involved. Many common services are pre-registered in FME for testing (Google Drive, Dropbox, Box, OneDrive, ArcGIS Online, FME Flow, and others). For production use, Safe Software recommends registering your own copy of the service using your organization’s Client Id and Client Secret.
- A web connection is a saved set of credentials, e.g., an OAuth access token, an API key, a username and password, against one of those services.
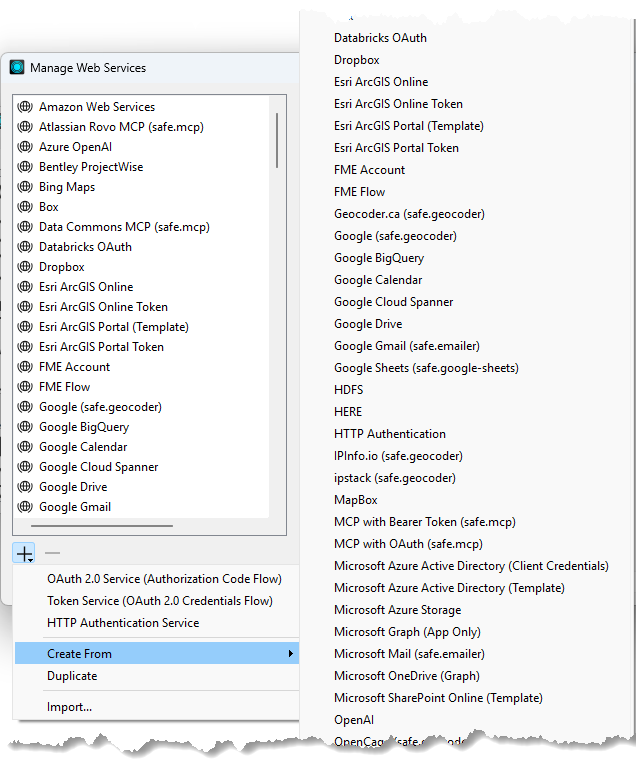
To register your own web service, on the Web Connections page click Manage Services. On the Manage Web Services dialog, you have two options:
- Start from scratch: Click Add Web Service and pick one of the protocols (OAuth 2.0 Service, Token Service, HTTP Authentication Service). Fill out the details and click Save.
- Create from an existing service (almost always preferable): Use Create From to start from a Safe-provided template such as Google Drive or Dropbox. Each template includes an External Help Links section pointing to the provider’s developer documentation for generating a Client Id and Client Secret. Paste those into the service and click Save.
To add a connection against that service, return to the Web Connections page and click Add [+] > Add. Pick the web service, name the connection, and click Authenticate. For OAuth 2.0 services FME opens your browser, the provider asks you to sign in and authorize FME, and the access token is returned and stored in the connection. You can also add a web connection on demand from within a workspace. For example, in the HTTPCaller’s Authentication Method > Web Connection drop-down, pick Add Web Connection.
The Client Id and Client Secret embedded in the pre-registered OAuth services belong to Safe Software and are subject to shared rate limits and provider-side outages outside Safe’s control. Register your own service before relying on a web connection in production.
Connection Storage Location
FME has to put the connections somewhere. Where it lives is configured under Utilities > FME Options > Default Paths > Connection Storage. You can click Manage > Change Connection Storage to switch modes. FME supports three modes.
Personal Database
The default mode. Connection data is stored and encrypted in the current user’s OS profile. On Windows the data file is typically at:
C:\Users\<username>\AppData\Roaming\Safe Software\FME\fme_userconnection.data
Connections in this mode are visible only to the OS user who created them; even other accounts on the same machine cannot read them. This is the right choice for individual desktop authoring and personal credentials.
Shared Database
For teams that want to author using the same set of connections, choose Shared Database. You specify two folders in the Change Connection Storage dialog:
- Database Folder: The folder (usually on a network share) where the connection data file lives.
- Key Folder: The folder containing the encryption key file. If no key file exists yet, FME creates one the first time you save a connection. You can optionally create a password for the file.
Any user who can read both folders sees the shared connections. When Connection Storage is Shared, the Visibility field on each individual connection becomes meaningful. Set a connection to Shared to publish it to other users on the share, or leave it as your private connection within the shared store.
FME Flow as a Connection Store
Starting in FME 2025.0, you can point Connection Storage at an FME Flow instance. The connection data, the key file, and the connections themselves live on FME Flow; FME Form pulls them in on demand, and the same connections are reused by FME Flow at workspace runtime. You authenticate to FME Flow once (under Default Paths) and your team’s database and web connections appear inside FME Workbench automatically. There is no shared network drive to administer and no manual upload step when you publish a workspace to FME Flow, as the connection is already there.
This mode is useful for ensuring your local connections stay in sync with organizational connections shared via FME Flow.
Encryption Keys
Whichever storage mode you pick, the credentials inside it are encrypted at rest. What differs is where the key comes from and who can read it:
- Personal Database: The key is tied to the OS user profile. You don’t manage it directly; another OS user on the same machine cannot decrypt your connections.
- Shared Database: The key is a separate file in the Key Folder. Anyone who can read that file can decrypt the connections in the Database Folder, so the file’s OS-level permissions are part of your security model. You can also set a Key File Password in the Change Connection Storage dialog as an extra layer.
- FME Flow: The key is managed by FME Flow alongside the connection data, and access is governed by FME Flow user permissions.
The Default Paths page in FME Options also allows you to define paths to other shared FME content like custom transformers. This option is especially useful for workgroups. For instance, if an entire workgroup uses just a few custom coordinate system definitions, keeping these definitions in one place means that everyone doesn't have to have a copy. Then, whenever any of the definitions are updated, the entire group automatically has access to the new version. Each time you start FME, it scans these folders and makes their content available.
Note that connection files are not shared this way; you must use one of the three options outlined above due to encryption requirements.
Learn More
Exercise

The City’s Planning Department runs an internal “What day is my garbage collected?” lookup. The workspace reads a postal address from the PostGIS database hosted on Amazon RDS, overlays it on the garbage zones, and writes a small HTML report. The Department lead has asked Frank to:
- Set the workspace to use a database connection.
- Use a web service to automatically store the reports in the team’s shared cloud folder so that field staff can open them from any device.
This exercise uses the Safe Software training PostGIS database hosted on Amazon RDS. No extra license is required. If you are taking a Safe Software-hosted training course, the connection FME Training PostGIS Database already exists on your training machine. You will delete and recreate it here so you have practiced the workflow.
1) Open Starting Workspace
- Start FME Workbench (2026.1 or later).
- Open the starting workspace (C:\FMEData\Workspaces\UseDataIntegrationBestPractices\manage-connections.fmw).
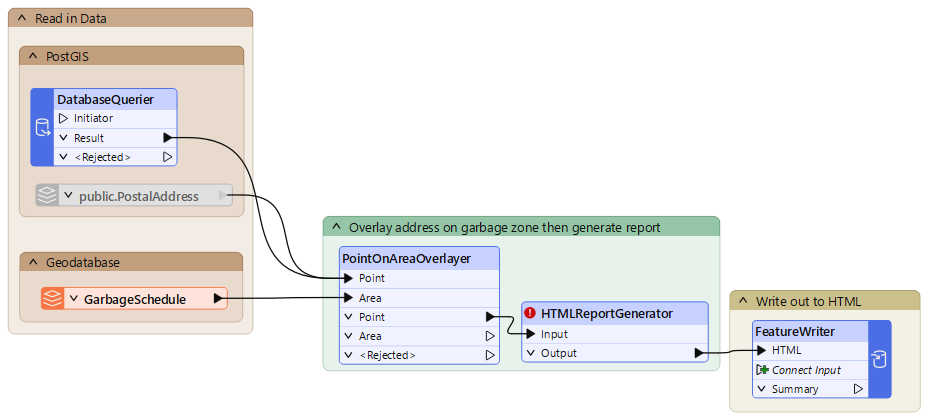
The workspace uses a DatabaseQuerier to read a specific address from a PostGIS database and an Esri Geodatabase reader that reads the GarbageSchedule. The DatabaseQuerier makes an SQL query and uses the named database connection FME Training PostGIS Database for credentials. These two datasets go in to a PointOnAreaOverlayer. After identifying the garbage zone for an address, the workspace uses an HTMLReportGenerator and a FeatureWriter (using the Text File format) to create the report.
There is a bug in FME 2026.1 impacting the HTMLReportGenerator (fixed in FME 2026.1.2). It appears invalid, but the workspace still functions correctly. You can ignore the incorrect invalid state.
You will learn more about the FeatureWriter in a later course. For now, suffice to say, it is a transformer that allows you to write data and then have the workspace continue processing.
We've also included a disabled PostGIS reader with a PostalAddress reader feature type in the starting workspace. You can see how that compares to using the DatabaseQuerier, if you want. The WHERE clause that restricts reading to a single address is configured on the reader feature type.
2) Delete Existing Database Connection
Let's delete the database connection so we can practice adding it. If you don't already have the FME Training PostGIS Database connection, you can skip this step.
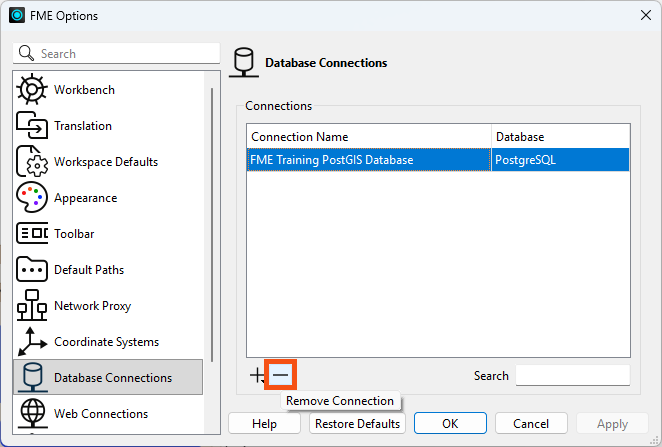
- Select Utilities > FME Options > Database Connections.
- In the list, locate the connection named FME Training PostGIS Database.
- Select it and click the Remove [−] button.
- Confirm the deletion by clicking the Delete button.
- Click OK to close FME Options.
- Notice the DatabaseQuerier becomes invalid.
- The transformer is looking for the named database connection, but no connection by that name exists.
3) Add Database Connection
- Click Utilities > FME Options > Database Connections again. Click the Add [+] button and choose Add.
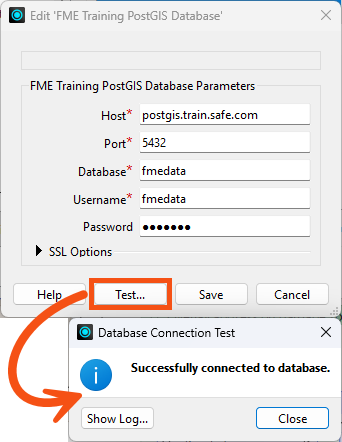
- Fill out the Add Database Connection dialog like this:
- Type: PostgreSQL
- PostGIS uses the PostgreSQL connection type.
- Name: FME Training PostGIS Database
- Use this exact name; the starting workspace references the connection by name and it must match.
- Host: postgis.train.safe.com
- Port: 5432
- Database: fmedata
- Username: fmedata
- Password: fmedata
- Click Test to confirm.
- You should see “Successfully connected to database.”
- Click OK to dismiss the Database Connection Test dialog.
- Click Save, then OK to close FME Options.
- Notice the DatabaseQuerier becomes valid again.
4) Verify the DatabaseQuerier Runs Successfully
- Run the workspace.
- Click Run again if the Incomplete Transformers dialog appears; this is an HTMLReportGenerator bug and can be ignored.
- In the Translation Parameter Values dialog, give
AddressID a value of 127209.
- Click Run again.
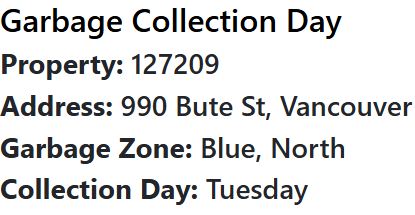
- The translation should complete and produce an HTML report on disk.
- Open the results with a web browser. They should look like the image below.
5) Pick a service you already use
Now let's set up the workspace to upload the report to a cloud folder. Choose any cloud service you have an account on. Any of the following work in FME out of the box via dedicated Connector transformers.
- Google Drive: GoogleDriveConnector
- Dropbox: DropboxConnector
- Microsoft OneDrive: OneDriveConnector
- Microsoft SharePoint: MicrosoftShareOnlineConnector or reader/writer
- Box: BoxConnector
- Amazon S3: S3Connector
- ArcGIS Online: ArcGISOnlineConnector
- Bentley ProjectWise: ProjectWiseWSGConnector
If you do not have a preference, Google Drive is a quick option: Safe Software provides a Google Drive template, and the OAuth flow takes a few clicks.
6) Register the Web Service
For training, you may skip this step and use the pre-registered service that ships with FME. Pick it directly in step 8. Never rely on the pre-registered service in production: it uses Safe Software’s shared credentials and is subject to provider-side rate limits and outages outside Safe’s control.
- Click Utilities > FME Options > Web Connections.
- Click the Manage Services button.
- On the Manage Web Services dialog, click Add Web Service.
- Choose Create From, then pick the template that matches your chosen service.
- Give the new service a descriptive Name (for example, My Org Google Drive).
- Expand External Help Links and follow the link to your provider’s developer documentation to create an OAuth application.
- Copy the Client Id and Client Secret from the provider’s console into the service and click Save.
- Close the Manage Web Services dialog.
7) Add Web Connection
- Back on the Web Connections page, click the Add [+] button and choose Add.
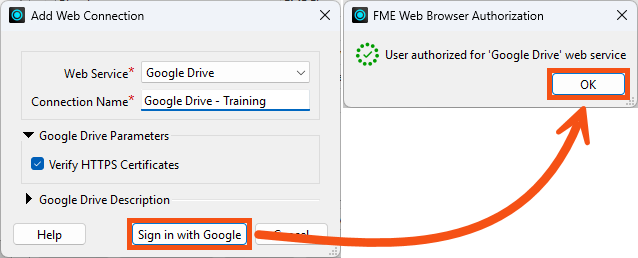
- Fill out the Add Web Connection dialog.
- These steps might be slightly different depending on the service you select.
- Web Service: the service you just registered (or the pre-registered one for training).
- Connection Name: something memorable, e.g., Google Drive - Training.
- Click Sign in with {Web Service Provider}.
- Your browser will open and the provider will ask you to sign in and grant FME access. When the callback succeeds, the access token is stored in the connection.
- Click OK.
8) Use Web Connection
Pick one of the two patterns below depending on what your chosen service supports and what you want to try. The names of the parameters will vary between Connectors, but the overall structure is similar.
Pattern A: Upload the HTML Report
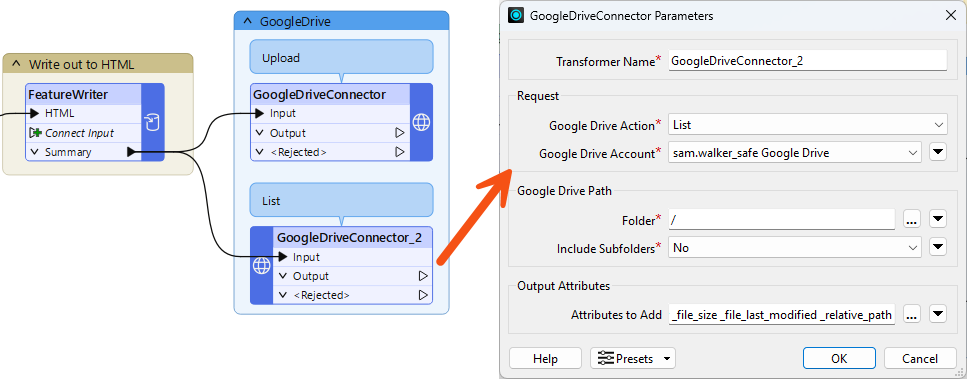
- Add the Connector transformer that matches your service (for example, DropboxConnector, GoogleDriveConnector, OneDriveConnector, BoxConnector, or S3Connector) downstream of the FeatureWriter’s Summary port.
- Configure the transformer:
- Web Connection / Account: the connection you created in step 8. It should be available in the dropdown.
- Action (or Request): Upload (or Put or Create File depending on the connector).
- Source File: the path to the HTML report the writer just produced. This path is stored in the attribute
_dataset, which the FeatureWriter created.
- Destination Folder / Path: the folder ID or path on the remote service, for example
/Garbage Day Reports/${AddressID}.html.
Pattern B: List a Directory
- If your chosen connector does not expose an Upload action, or you just want to confirm authentication, use a directory-listing pattern instead. Add the connector transformer (or an HTTPCaller pointed at the service’s “list folder” REST endpoint with Authentication Method = Web Connection) to an empty branch in the workspace:
- Action (or Request): List (or the equivalent GET on the service’s folder-children endpoint).
- Web Connection / Authentication: the connection you created in step 8.
- Path / Folder: the folder to list — root, or a specific folder ID/path.
9) Run and Verify
- Run the workspace.
- Click Run again if the Incomplete Transformers dialog appears; this is an HTMLReportGenerator bug and can be ignored.
- In the Translation Parameter Values dialog, give
AddressID a value of 127209.
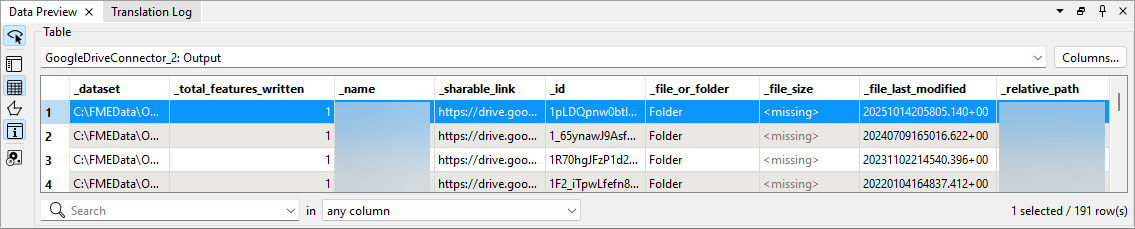
- Inspect the Connector's data cache to confirm success.
- Pattern A: you should see a link to the uploaded file, a confirmation of the number of features or files uploaded, etc.
- Pattern B: you should see the directory listing data.
- Save the workspace.
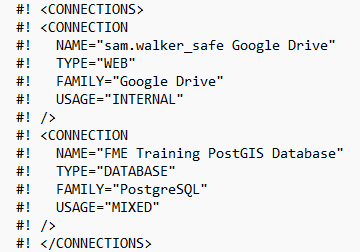
- Open the workspace using Notepad or similar to view the underlying XML.
- Note that nowhere in the workspace XML do your database password or your OAuth token appear. Only the connection names are stored. A colleague with their own copies of the same-named connections can run this workspace unchanged.
Leave Us Feedback on This Lesson